Tag Archives: venison

How to: Breaking down a leg of Venison

hunters kitchen spread

So you’ve done the hard yards and carried your meat home, now it’s time to turn it into something you can cook with. When breaking down a whole deer taking out the back steaks are pretty self-explanatory, just make sure that you run your knife hard up against the backbone to make sure you get all the meat. You can take off the shoulder by cutting away behind the shoulder blade and the hind quarters can be removed by going through the hip joint. Make sure you don’t forget the inner fillets which run along the spine on the inside of the cavity and make sure you take the neck meat, it’s some of the best braising meat in my opinion. Personally I like to dice up the shoulder meat for stews, pies, curry etc and the back steaks I keep relatively whole for the BBQ or for pan frying. Don’t throw out any trim as this can be put through the mincer and used for things like meatballs, lasagne and chilli. The hind leg is probably the most difficult piece of meat to deal with so that’s what we’ll be breaking down today. The hind leg is made up of four primal cuts (Rump, knuckle, topside and silverside) plus the shank. These four main cuts are collectively known as Denver leg and I use them interchangeably using a fast cooking method (fry, roast, BBQ etc) with the shank the only cut that I think always needs to be braised. Depending on the age and condition of your particular animal you should be able to cook all these cuts as you would a steak, however once you’ve aged your meat to your liking and your meat is still tough one you may want to change to a slow cook method to make it nice and tender.


You will need:

A tray to place you meat in as you prepare it

Two bowls: one for your off cuts and one for rubbish

A good sized chopping board with a wet towel underneath to stop it moving

A sharp boning knife and steel

A hacksaw (optional)


Step 1:

Set your work bench up with all the gear you’ll need and place your leg flat on the chopping board. What we’re looking to do is to remove all the main muscle groups which are all separated by connective tissue. You’ll be able to pull away the muscle groups and use the knife to just help them on their way.
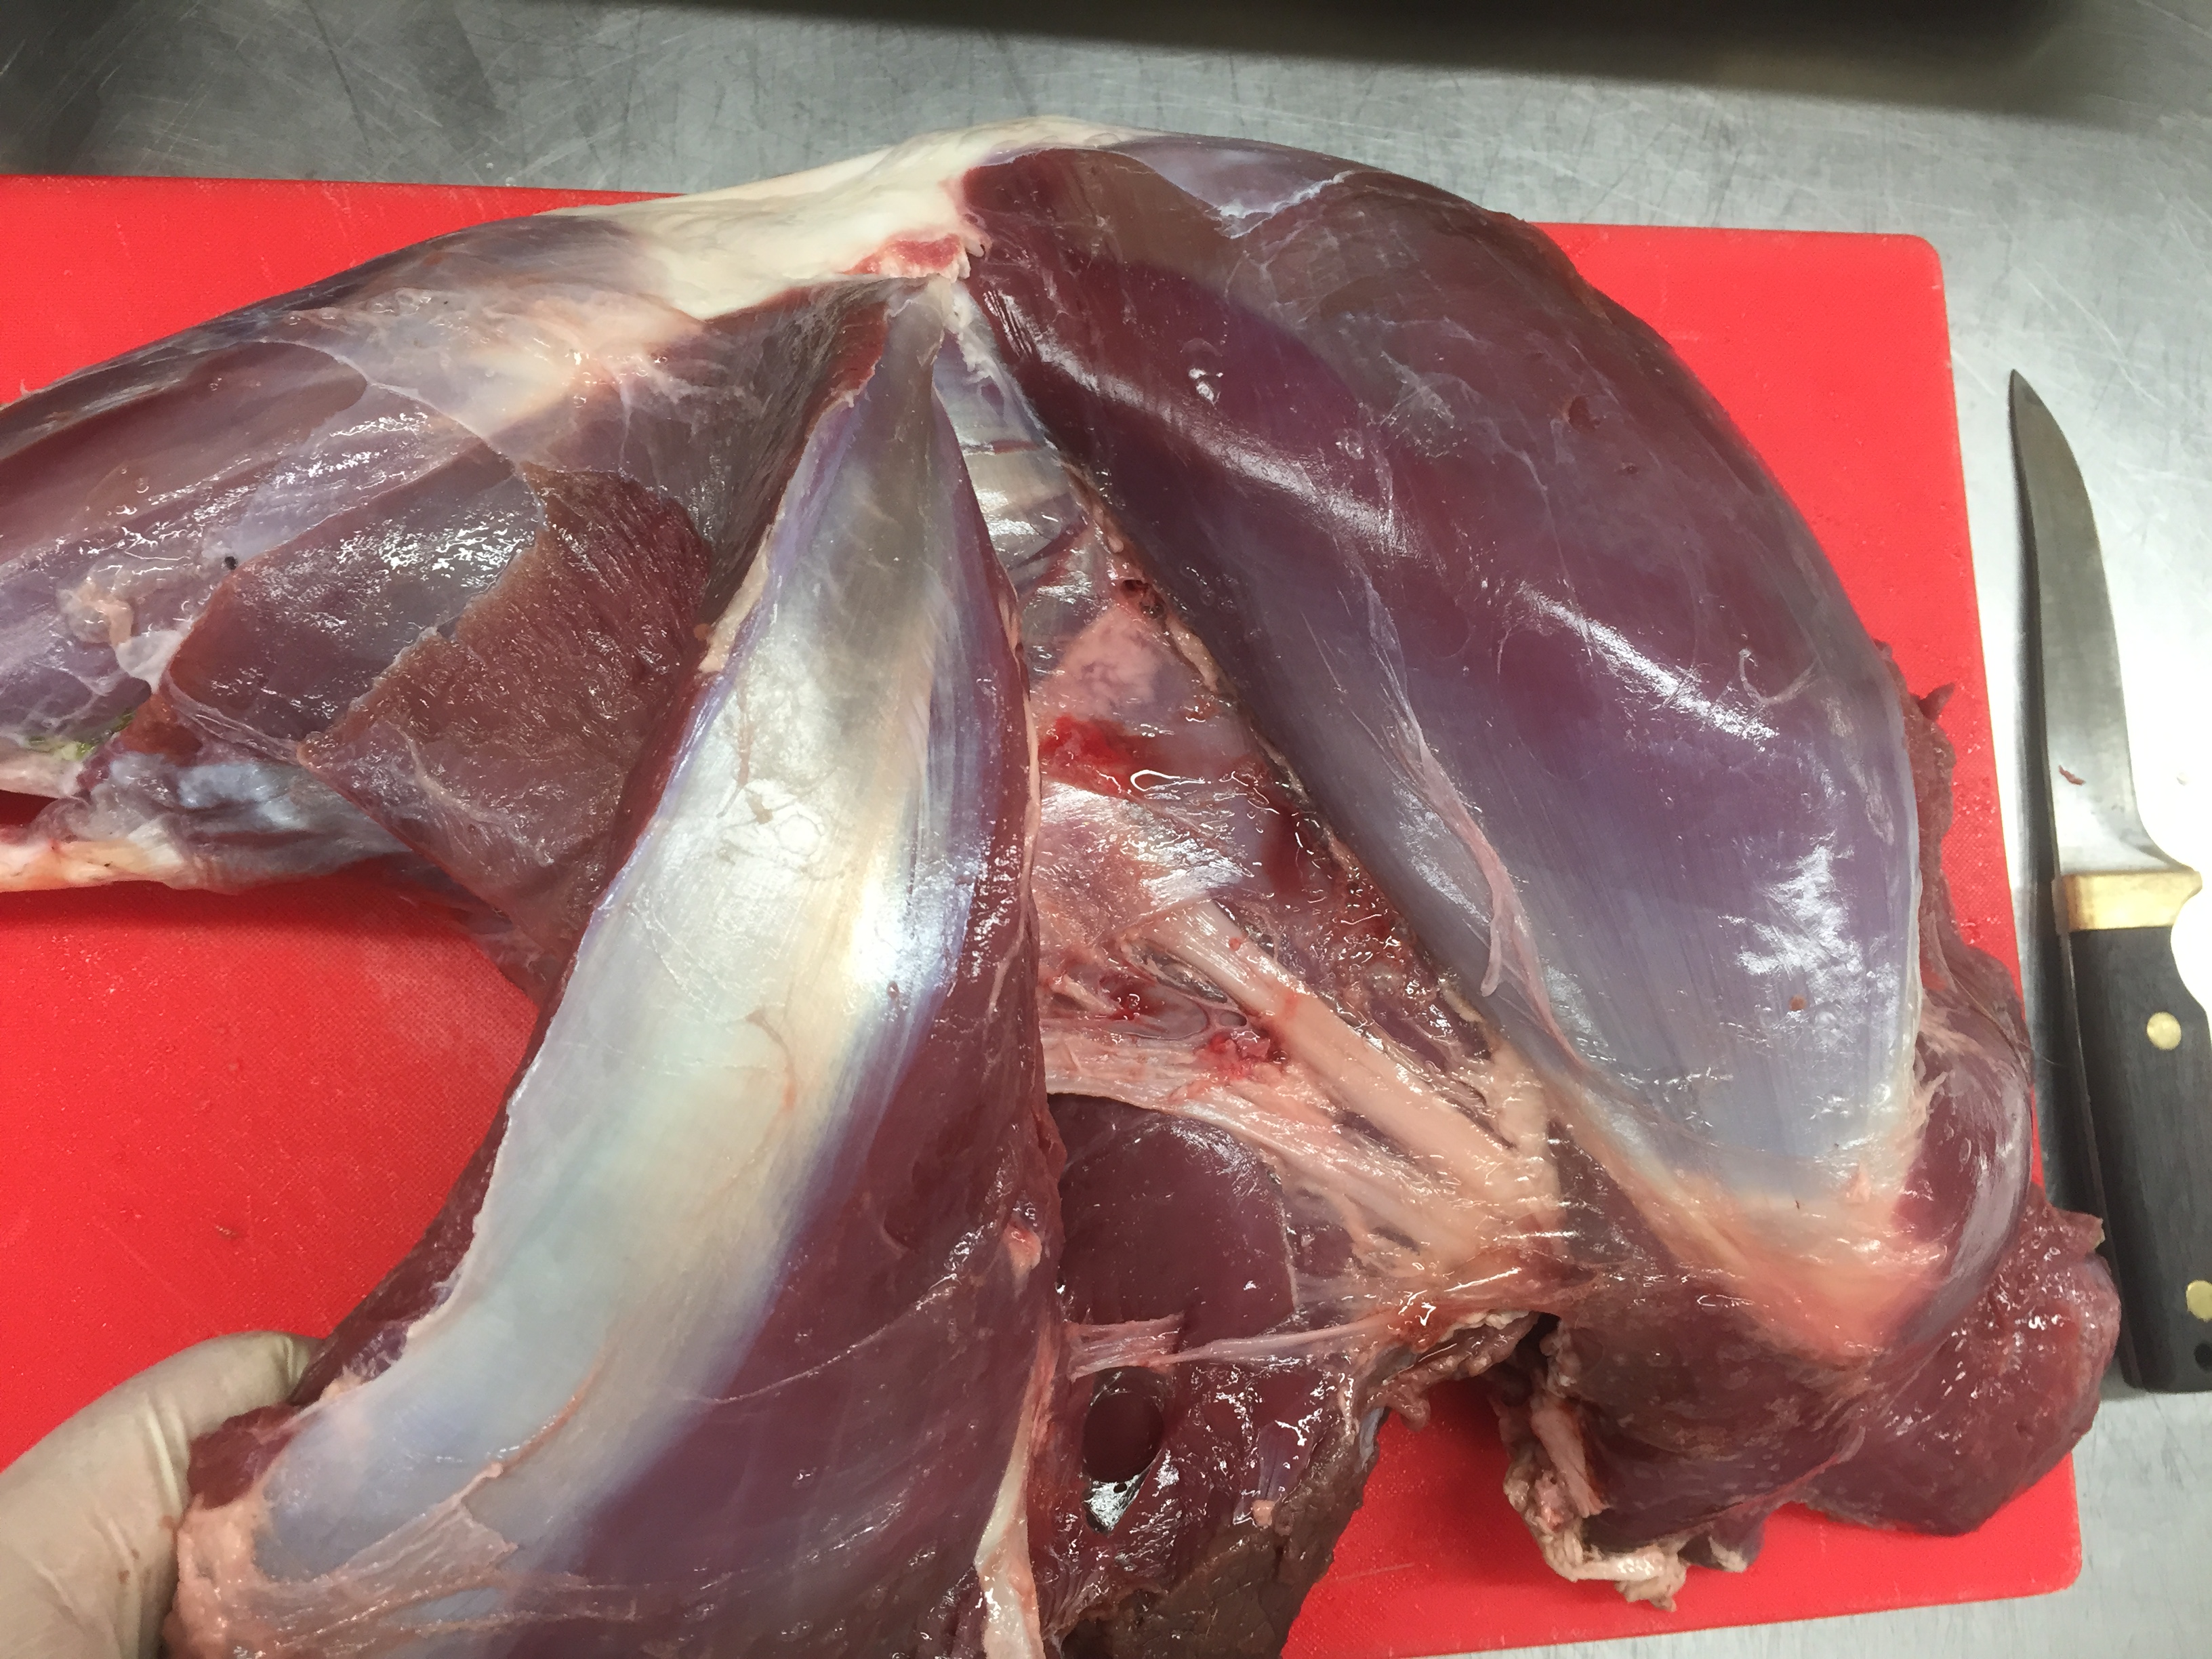
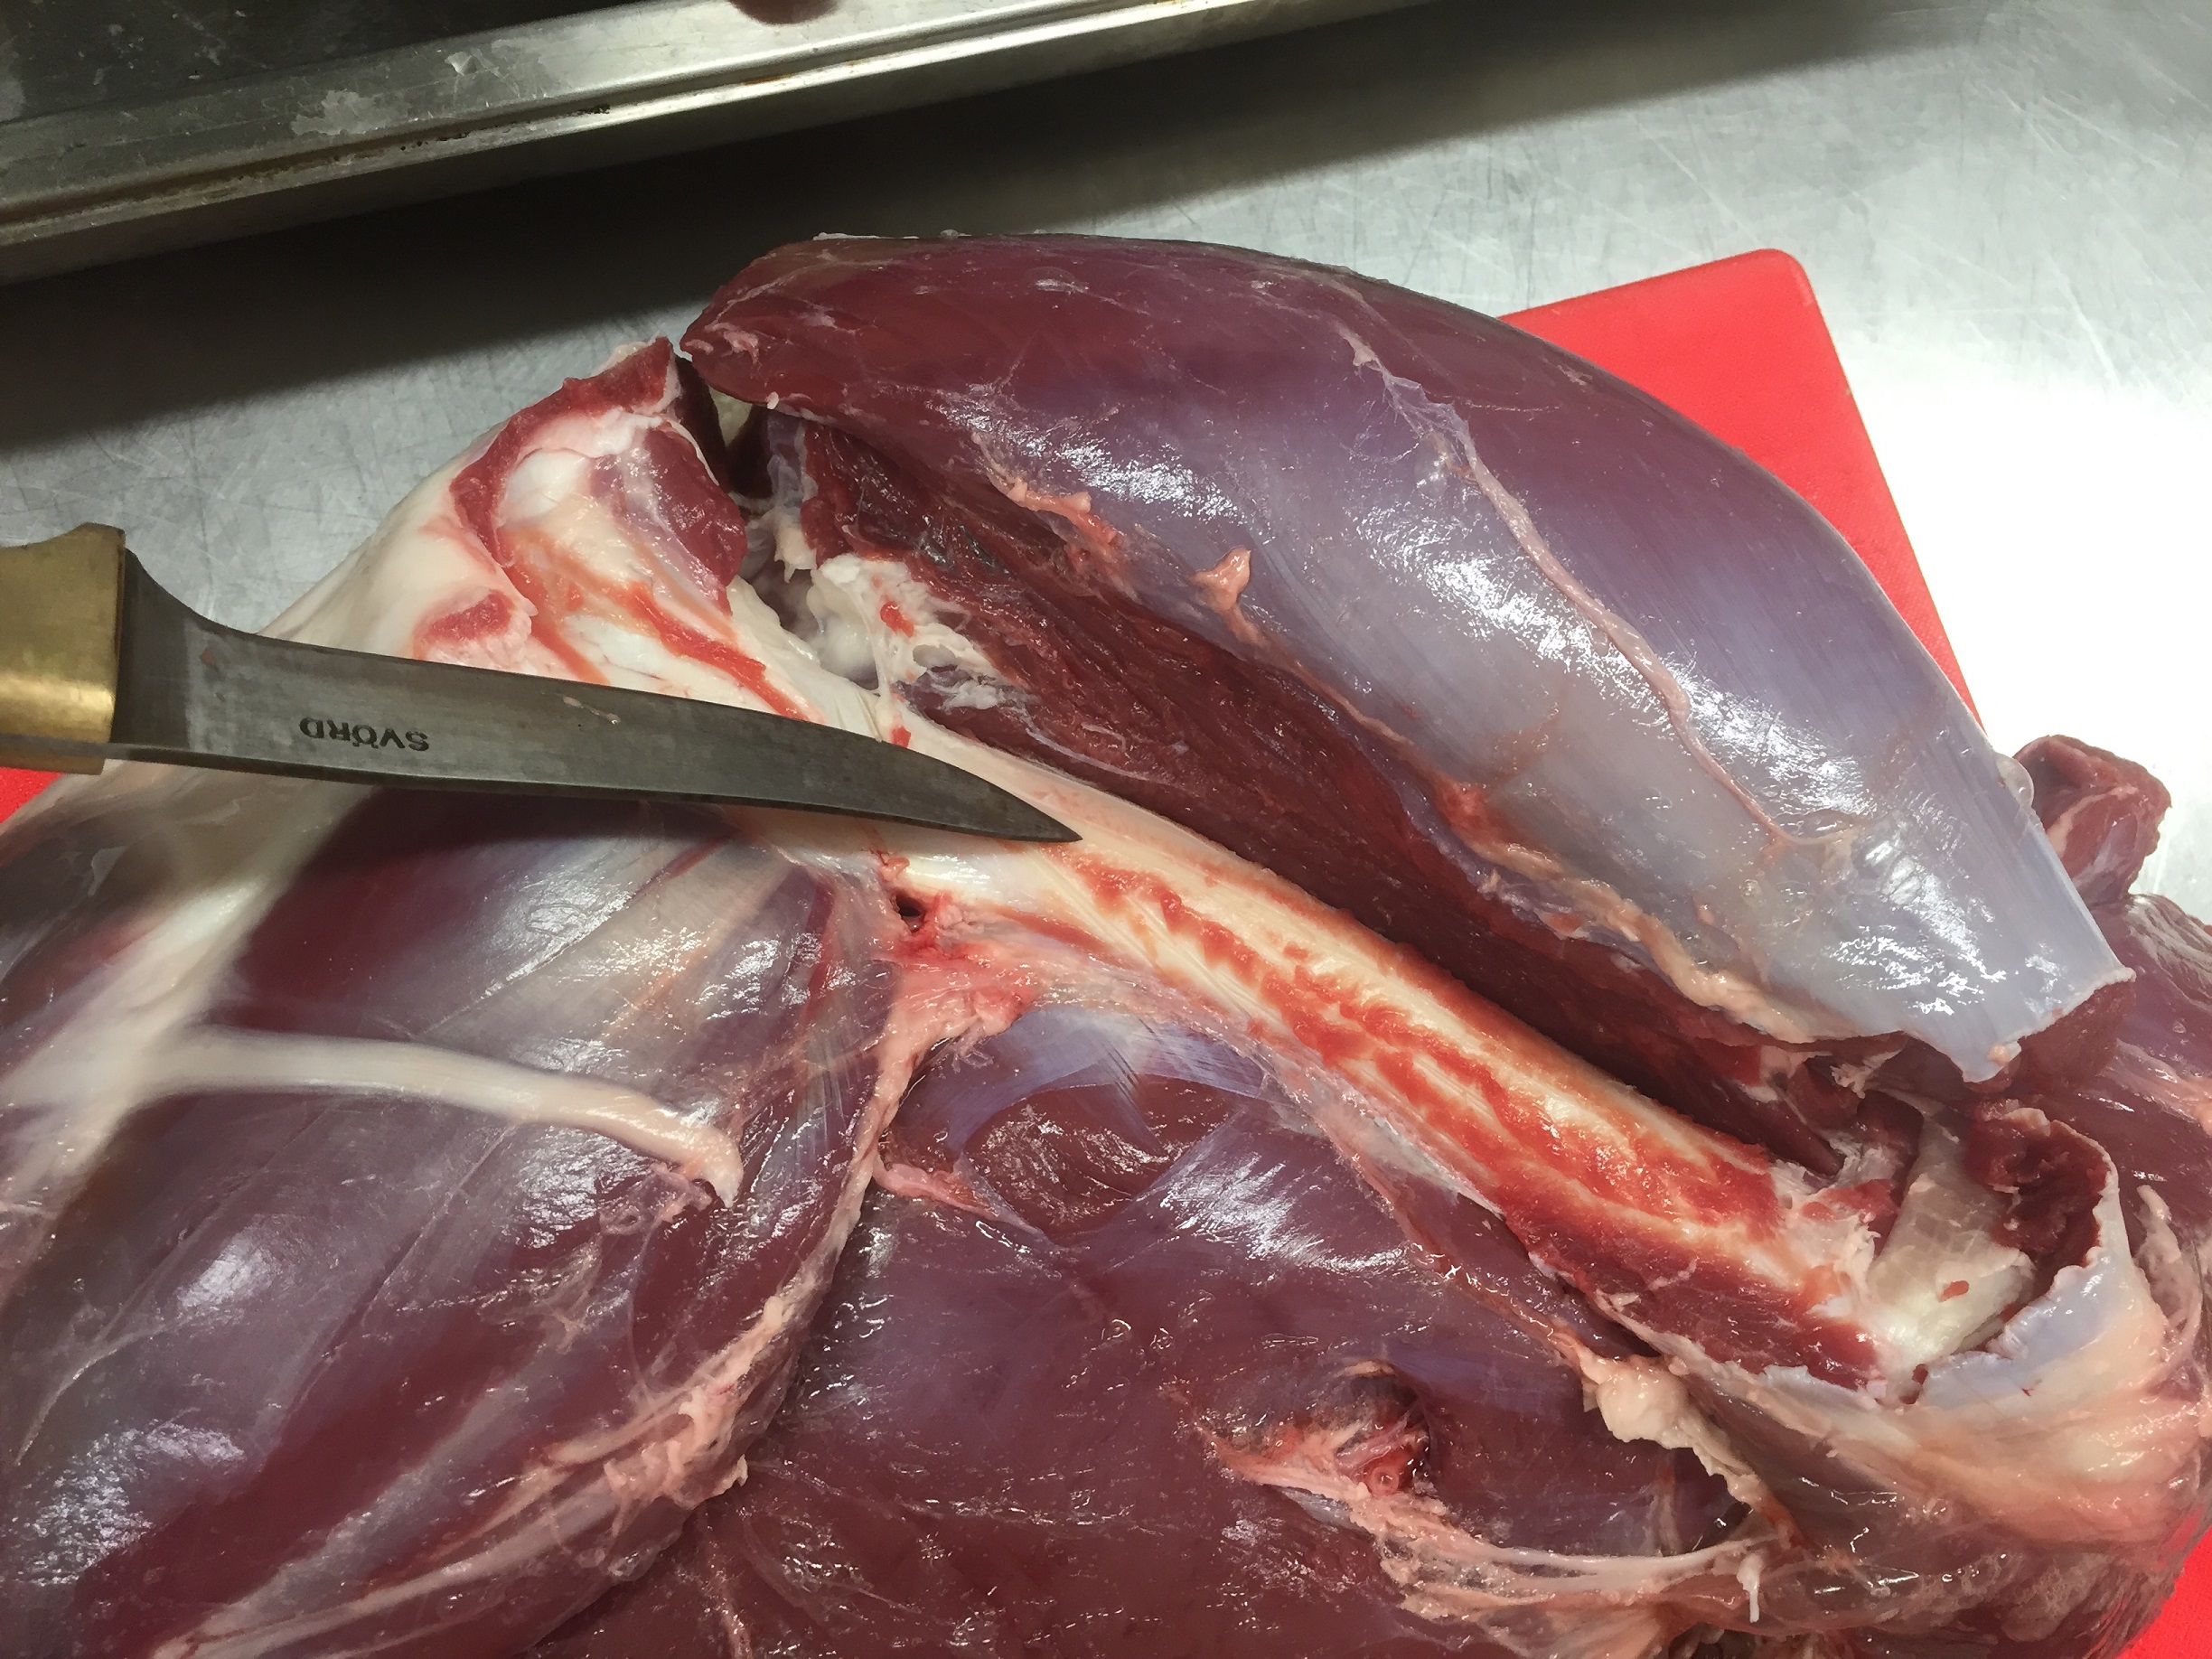
 IMG_0722

Step 1

Step 2:

Once the muscle groups are opened up and you’ve exposed the main leg bone (femur) you can just cut away the muscle with the knife hard up against the bone, this way you don’t waste any meat.
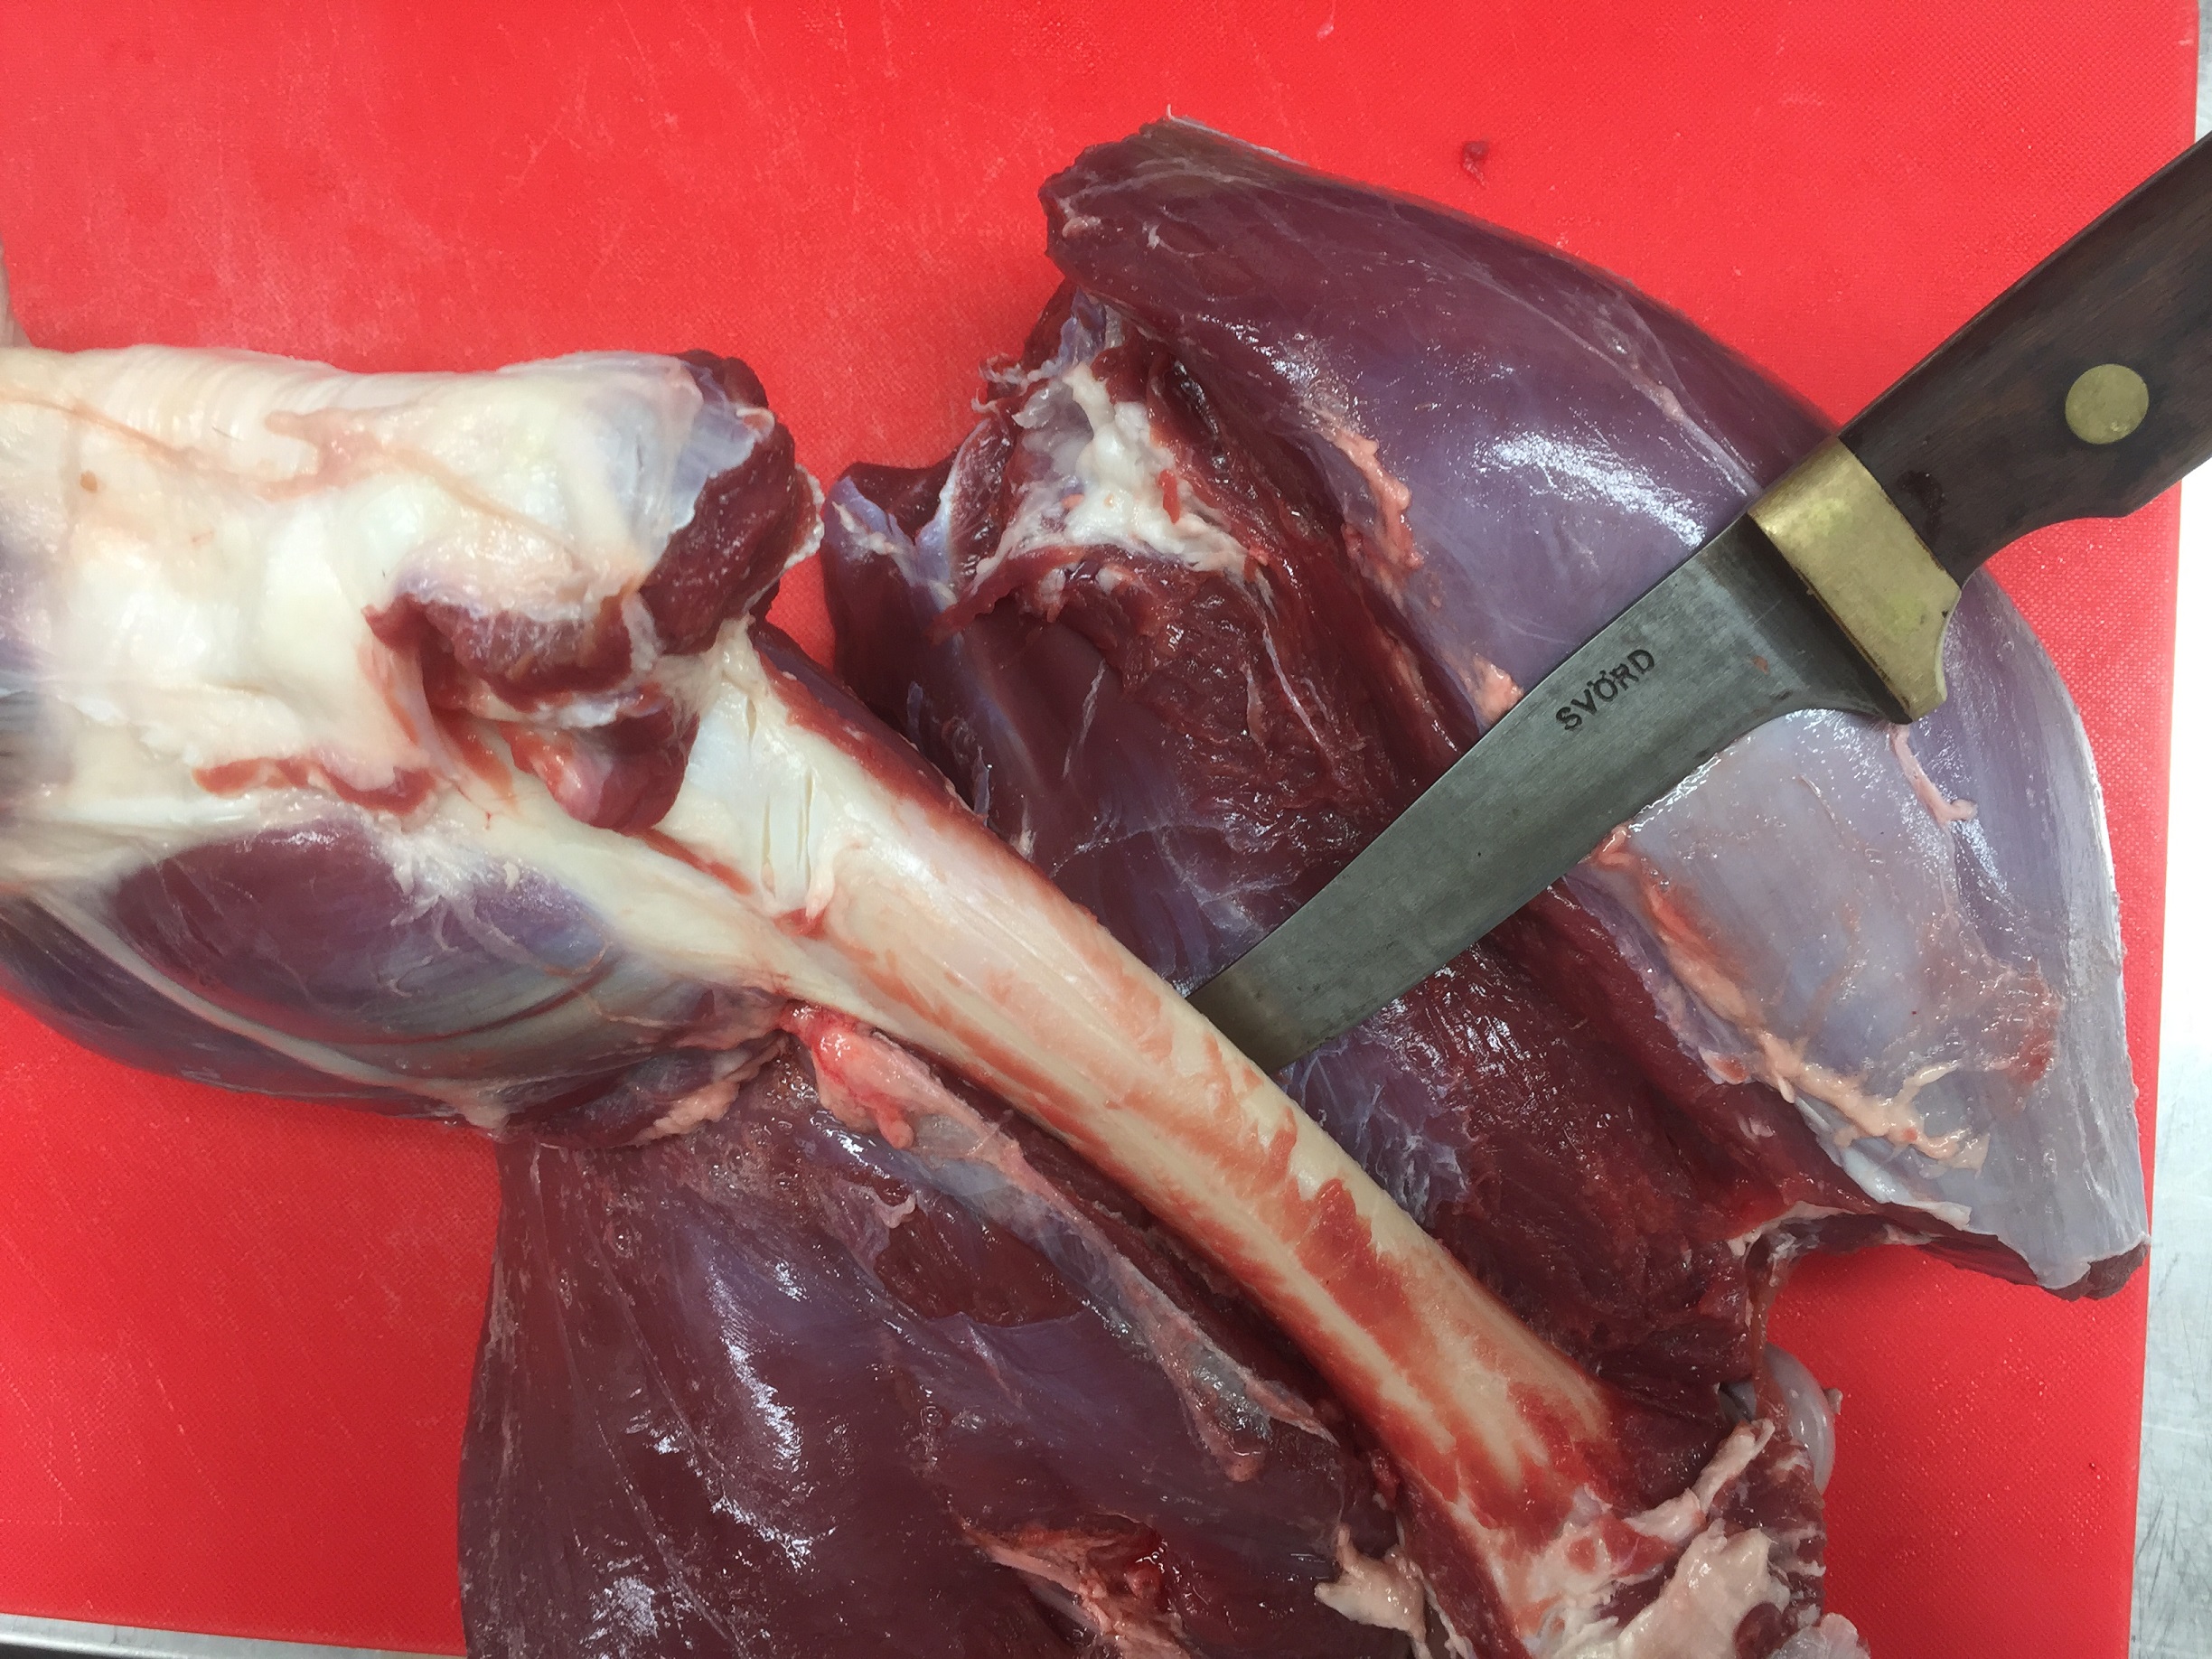
 Step 2

Step 3:

Keep following the seams and remove the main muscle groups off the bone and set aside.
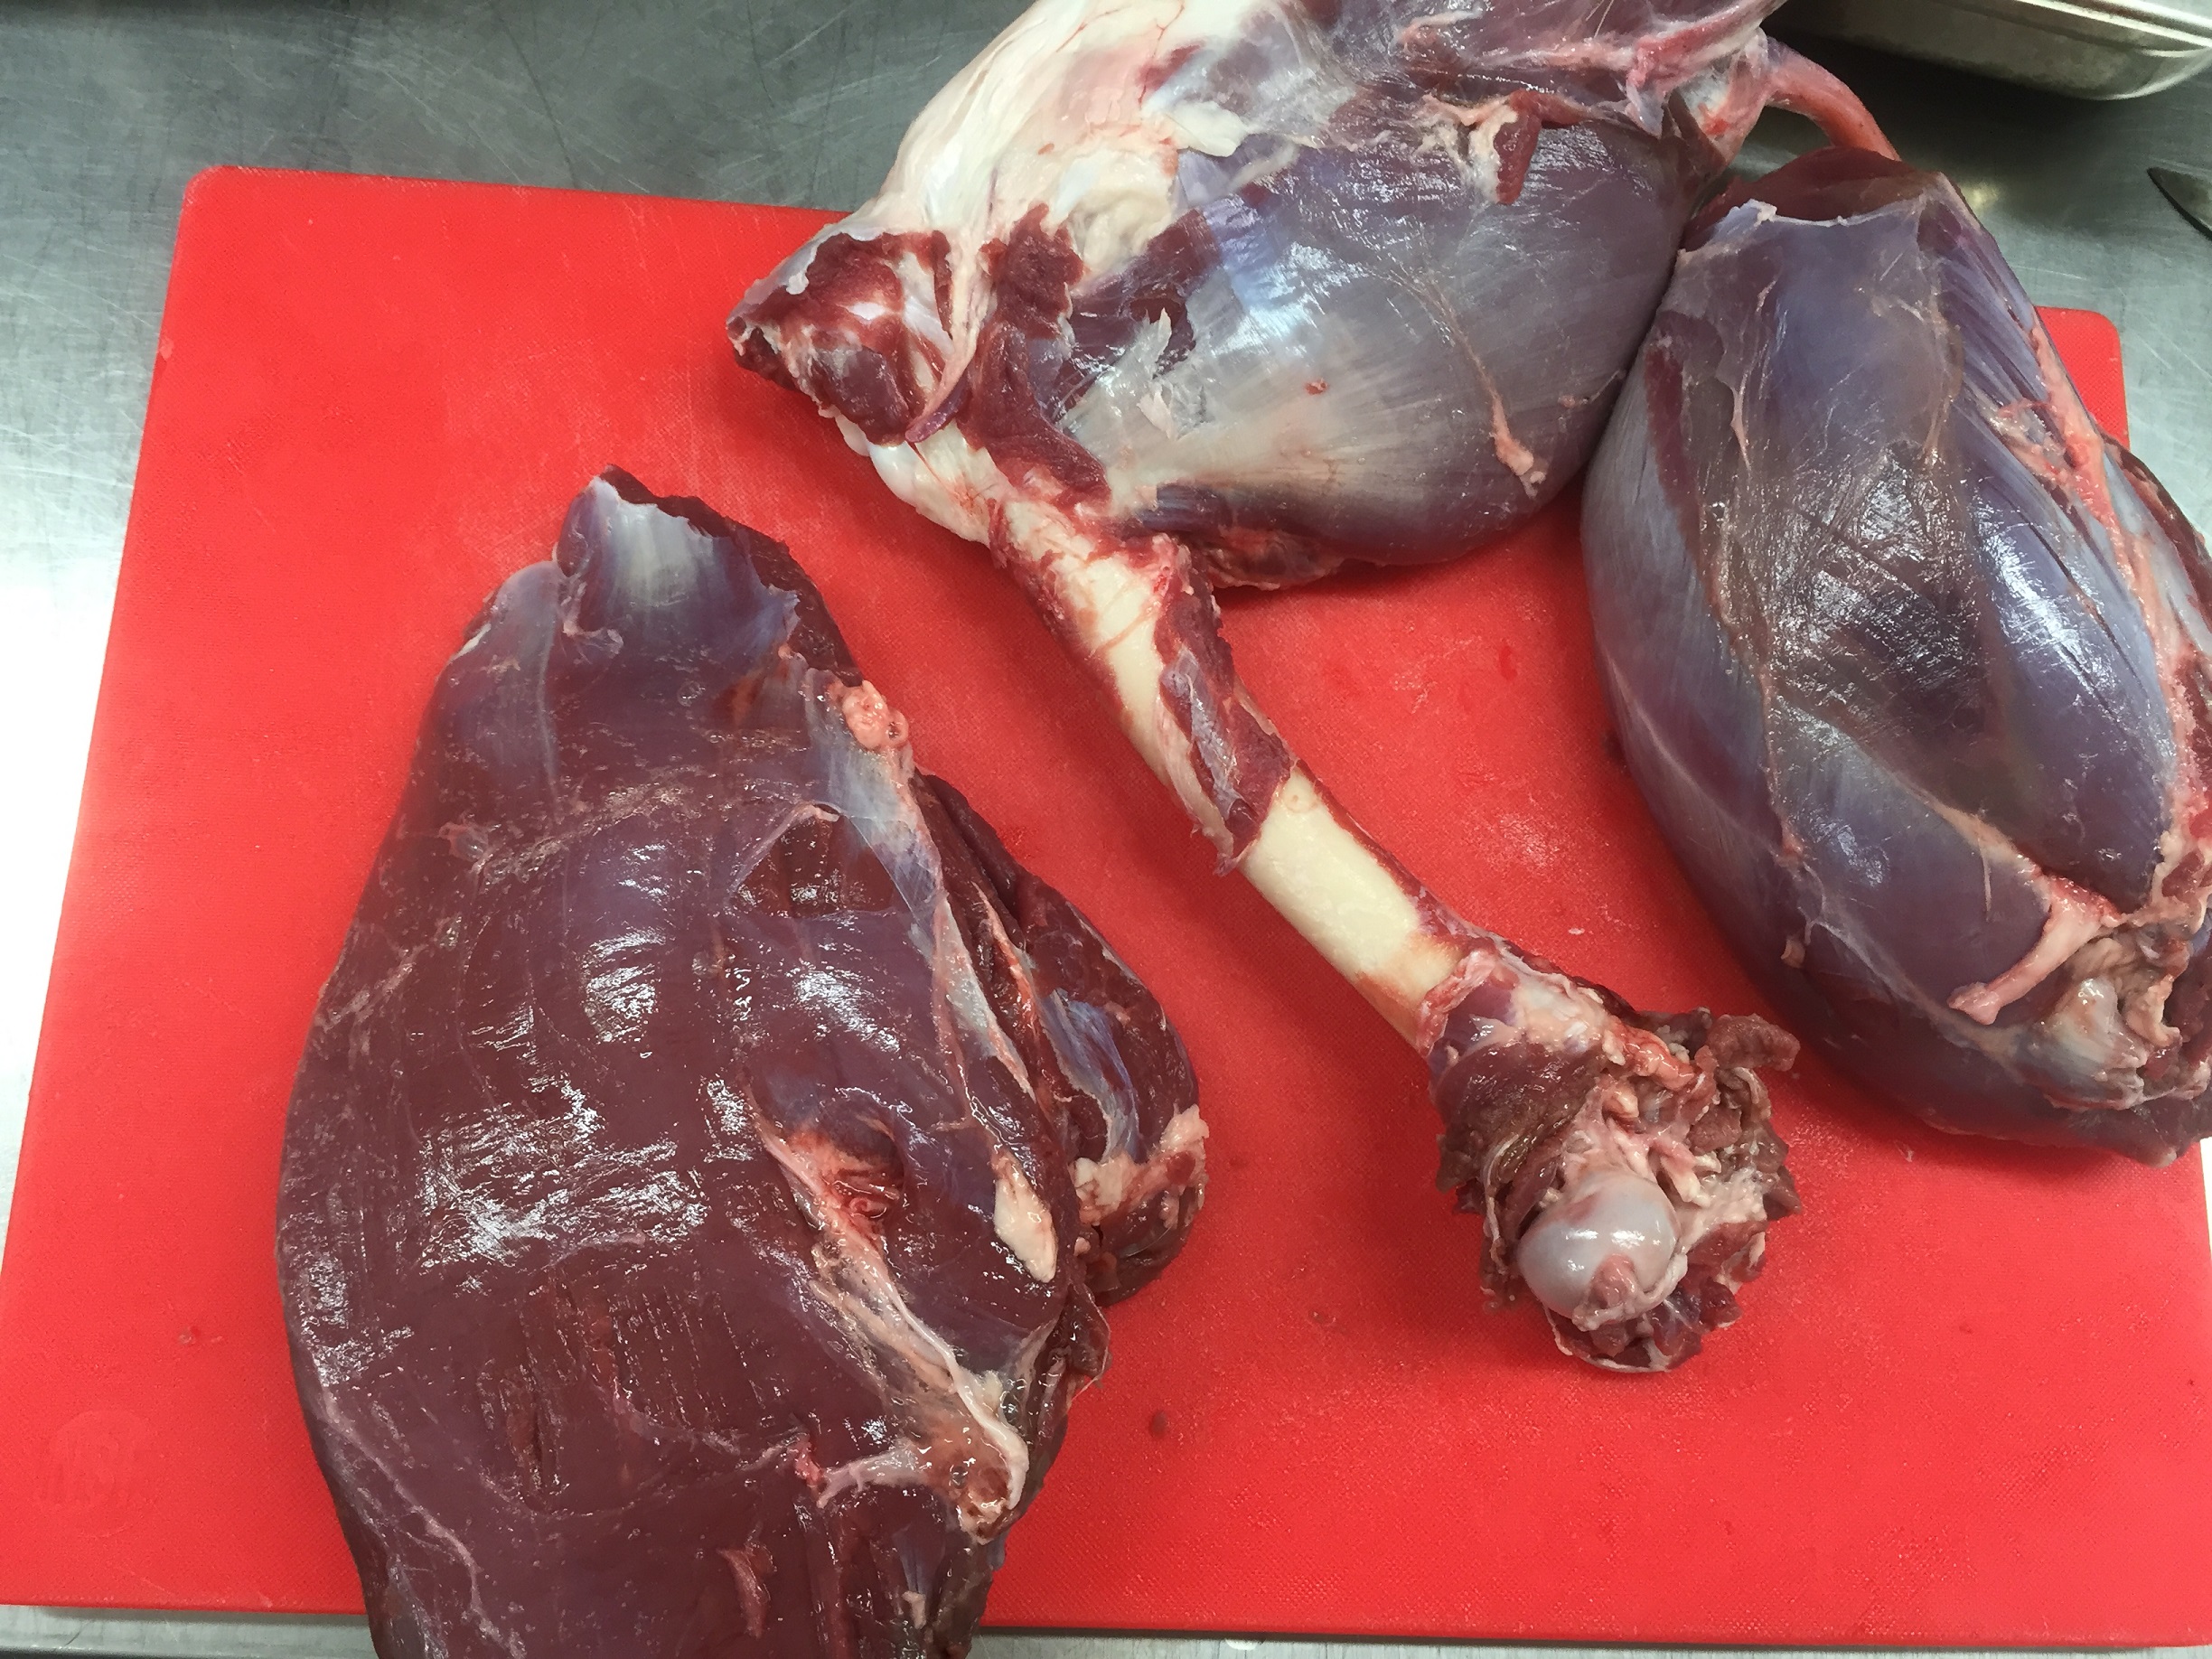
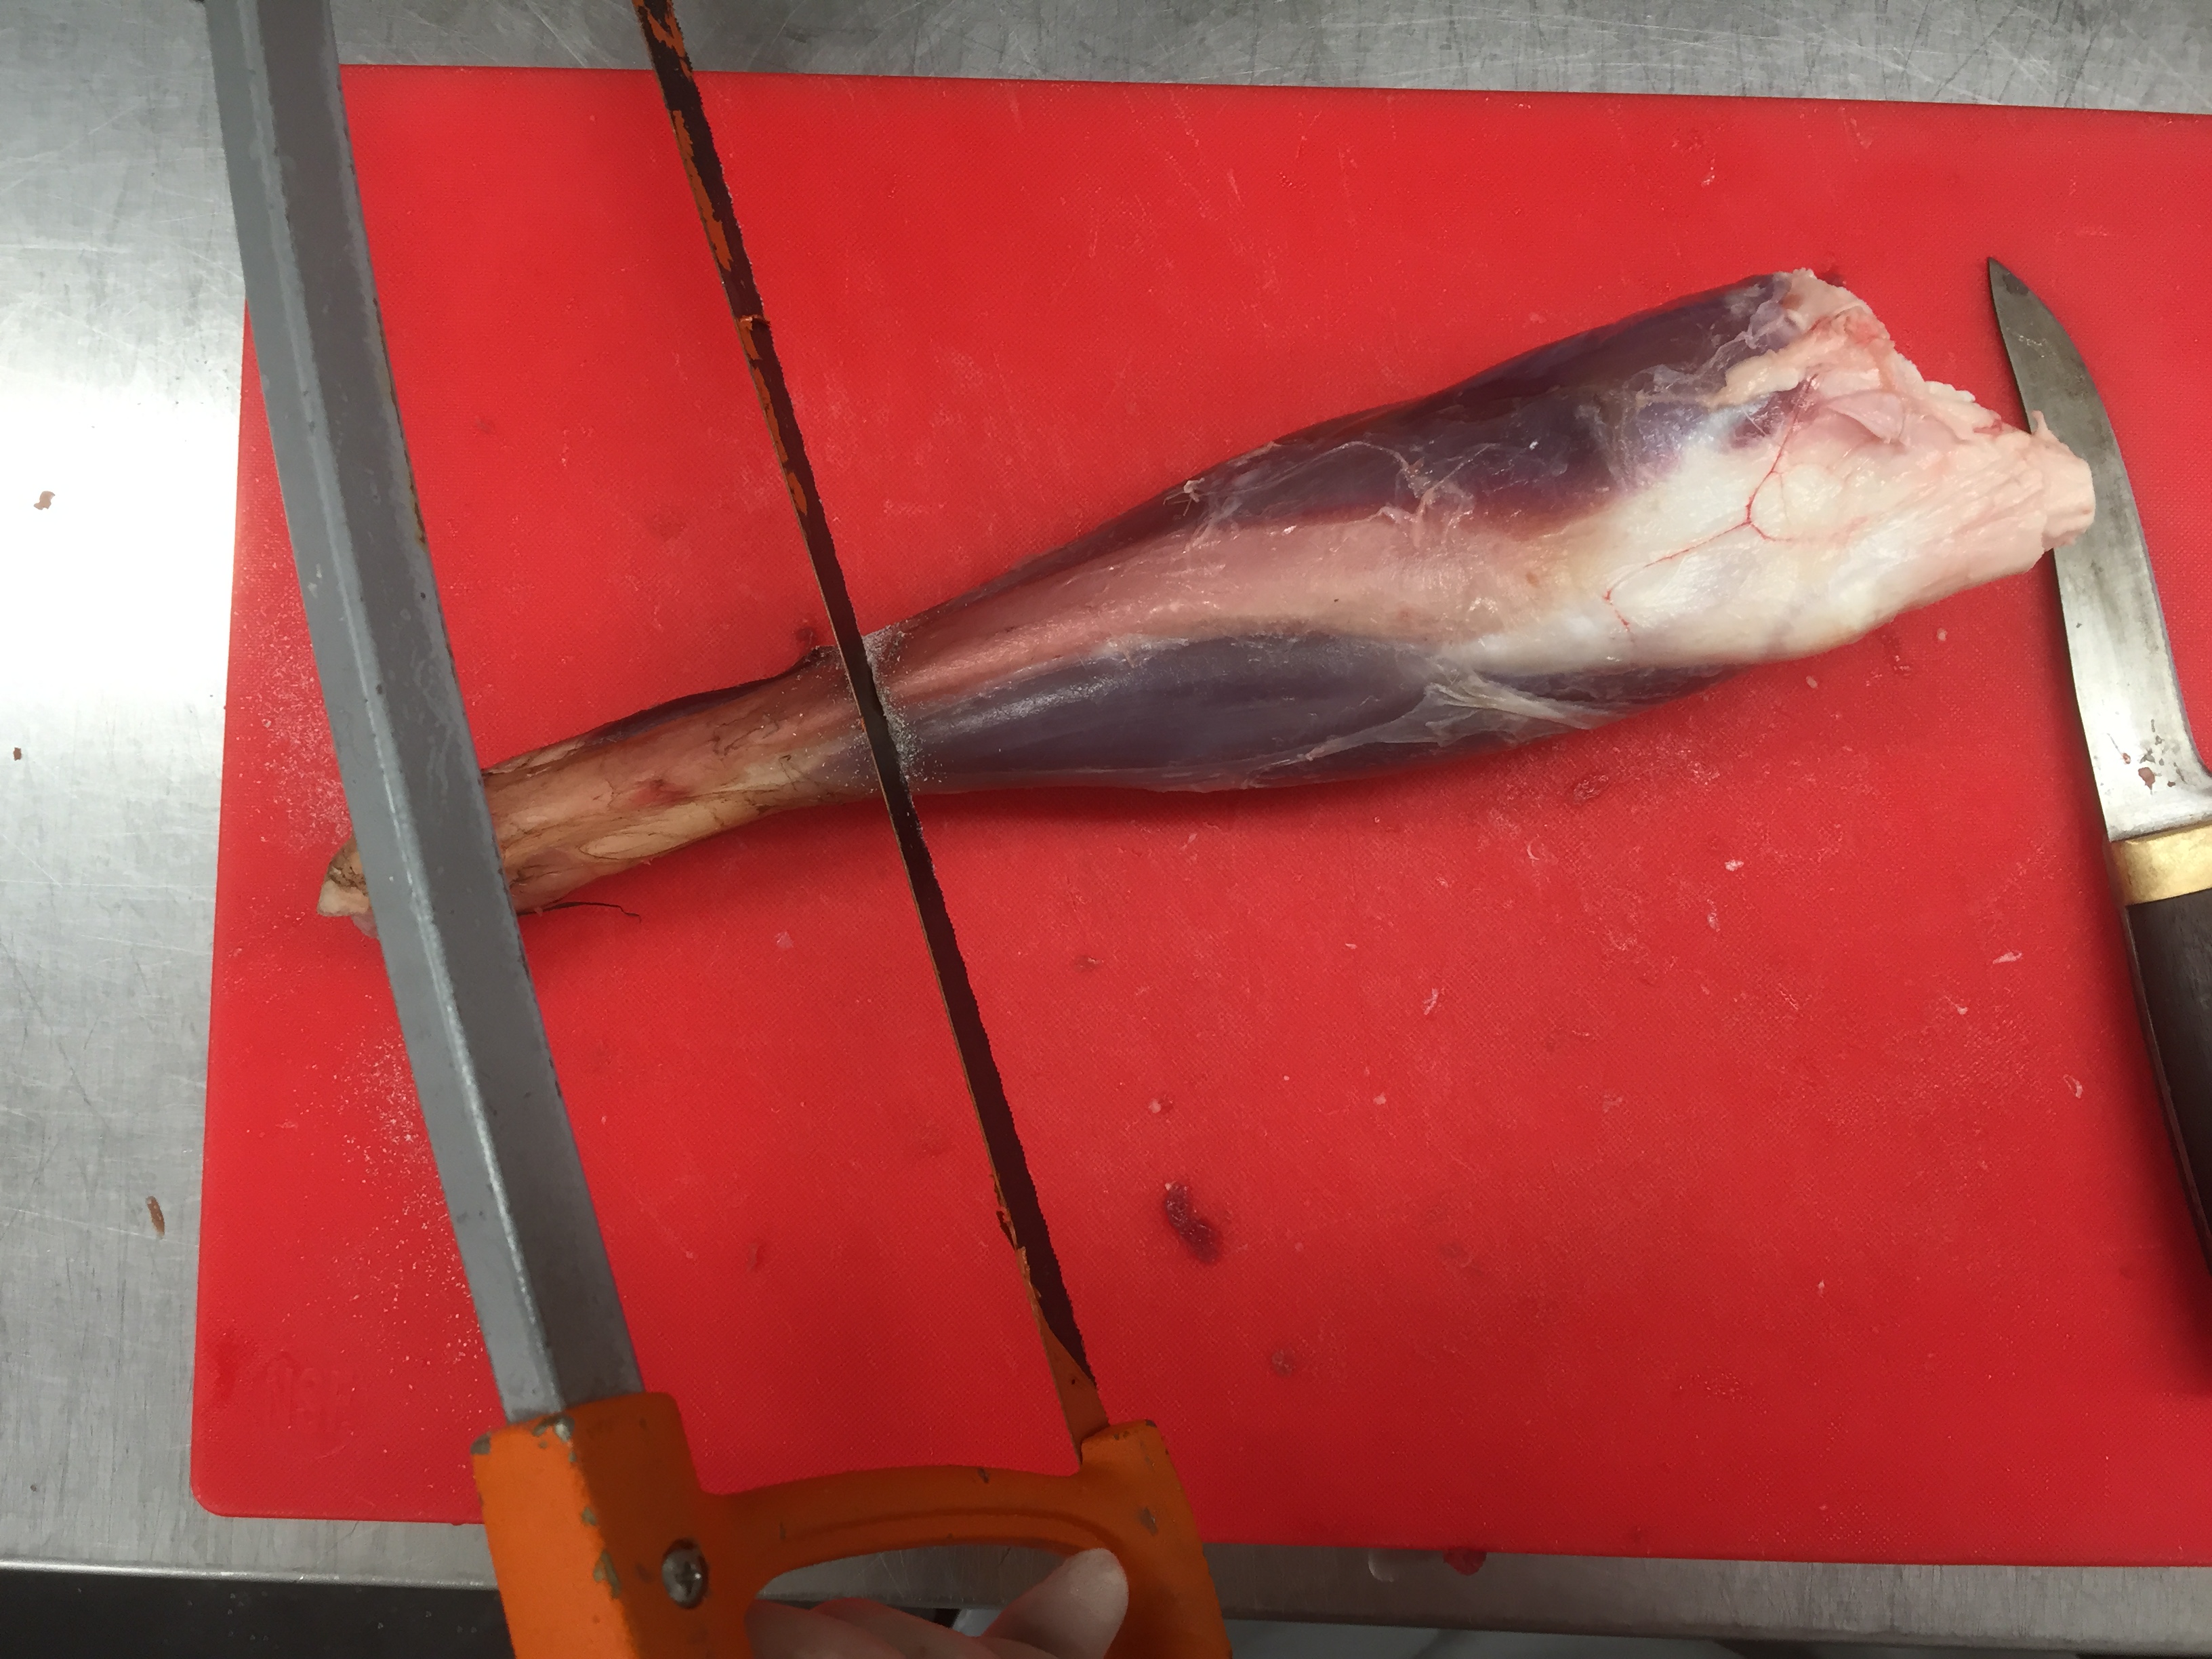
Step 3

Step 4:

Remove the side muscle from the shank and keep this to one side for slow cooking.
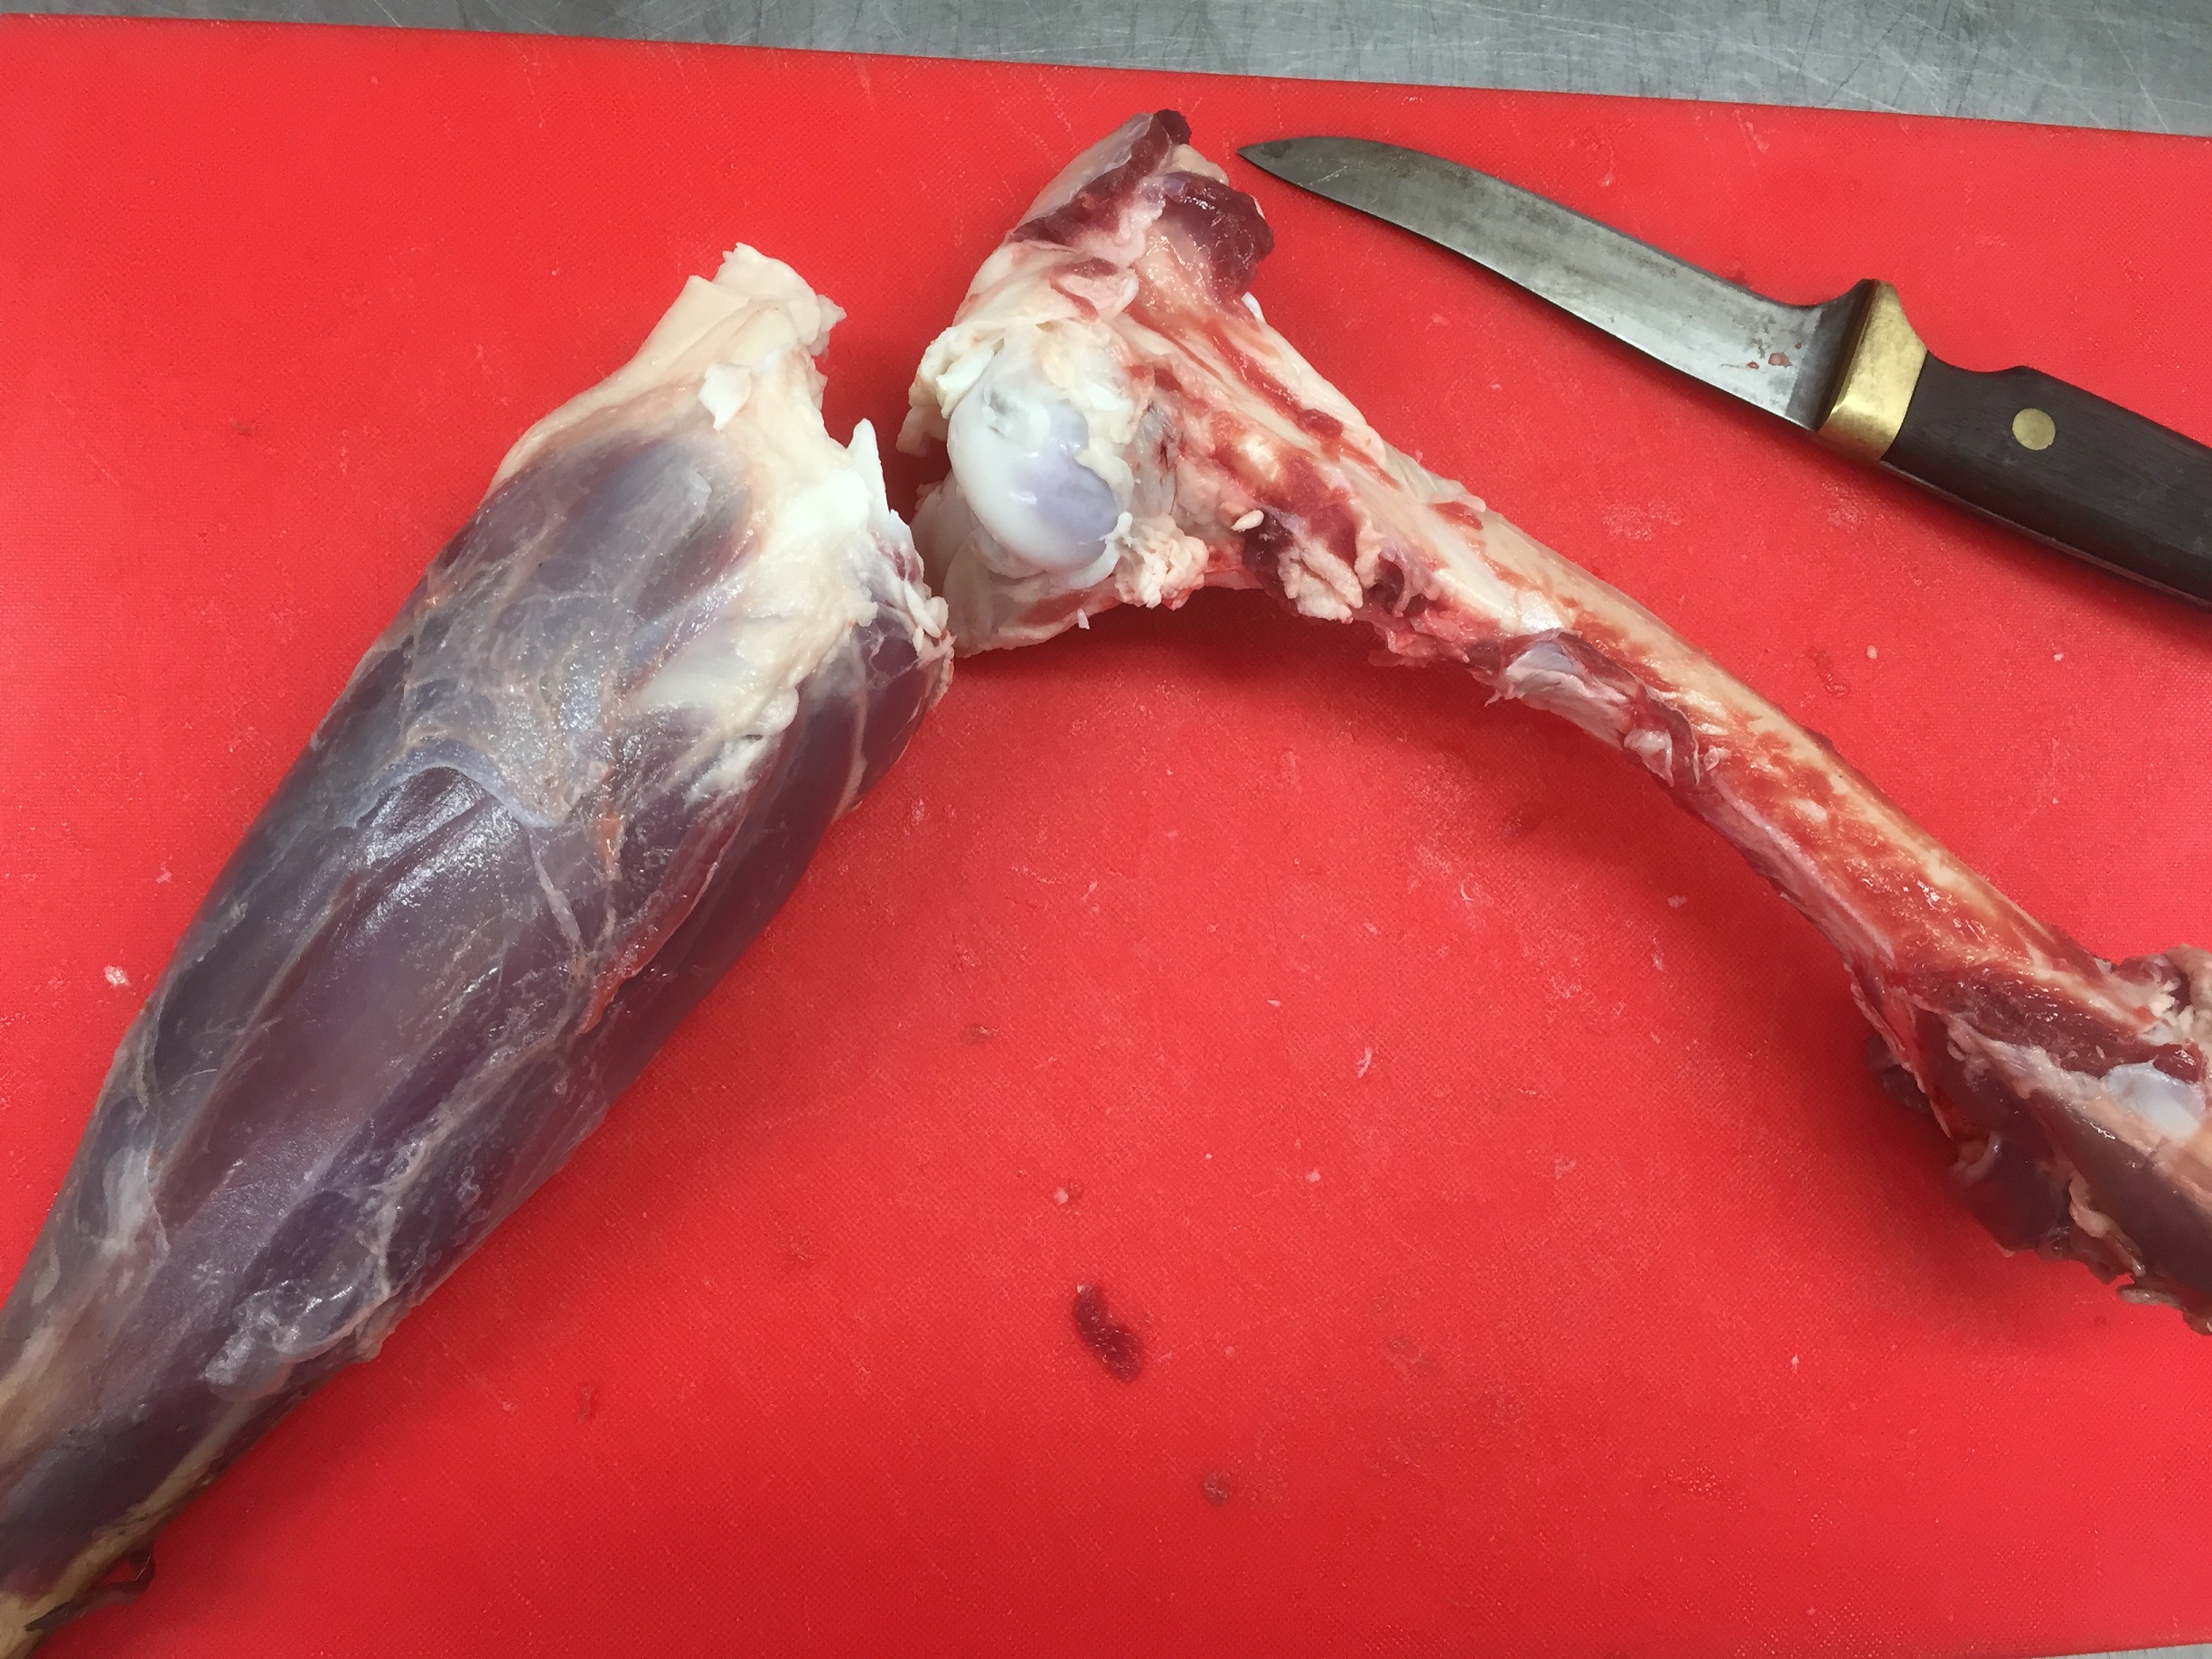
 Step 4

Step 5:

Cut through the joint and separate the shank and keep for slow cooking. You can take the meat off the shank if you like or using a hacksaw remove the end of the bone so the shank fits better in your pot or slow cooker. The femur you can use to make stock of give to your dog and make his day.
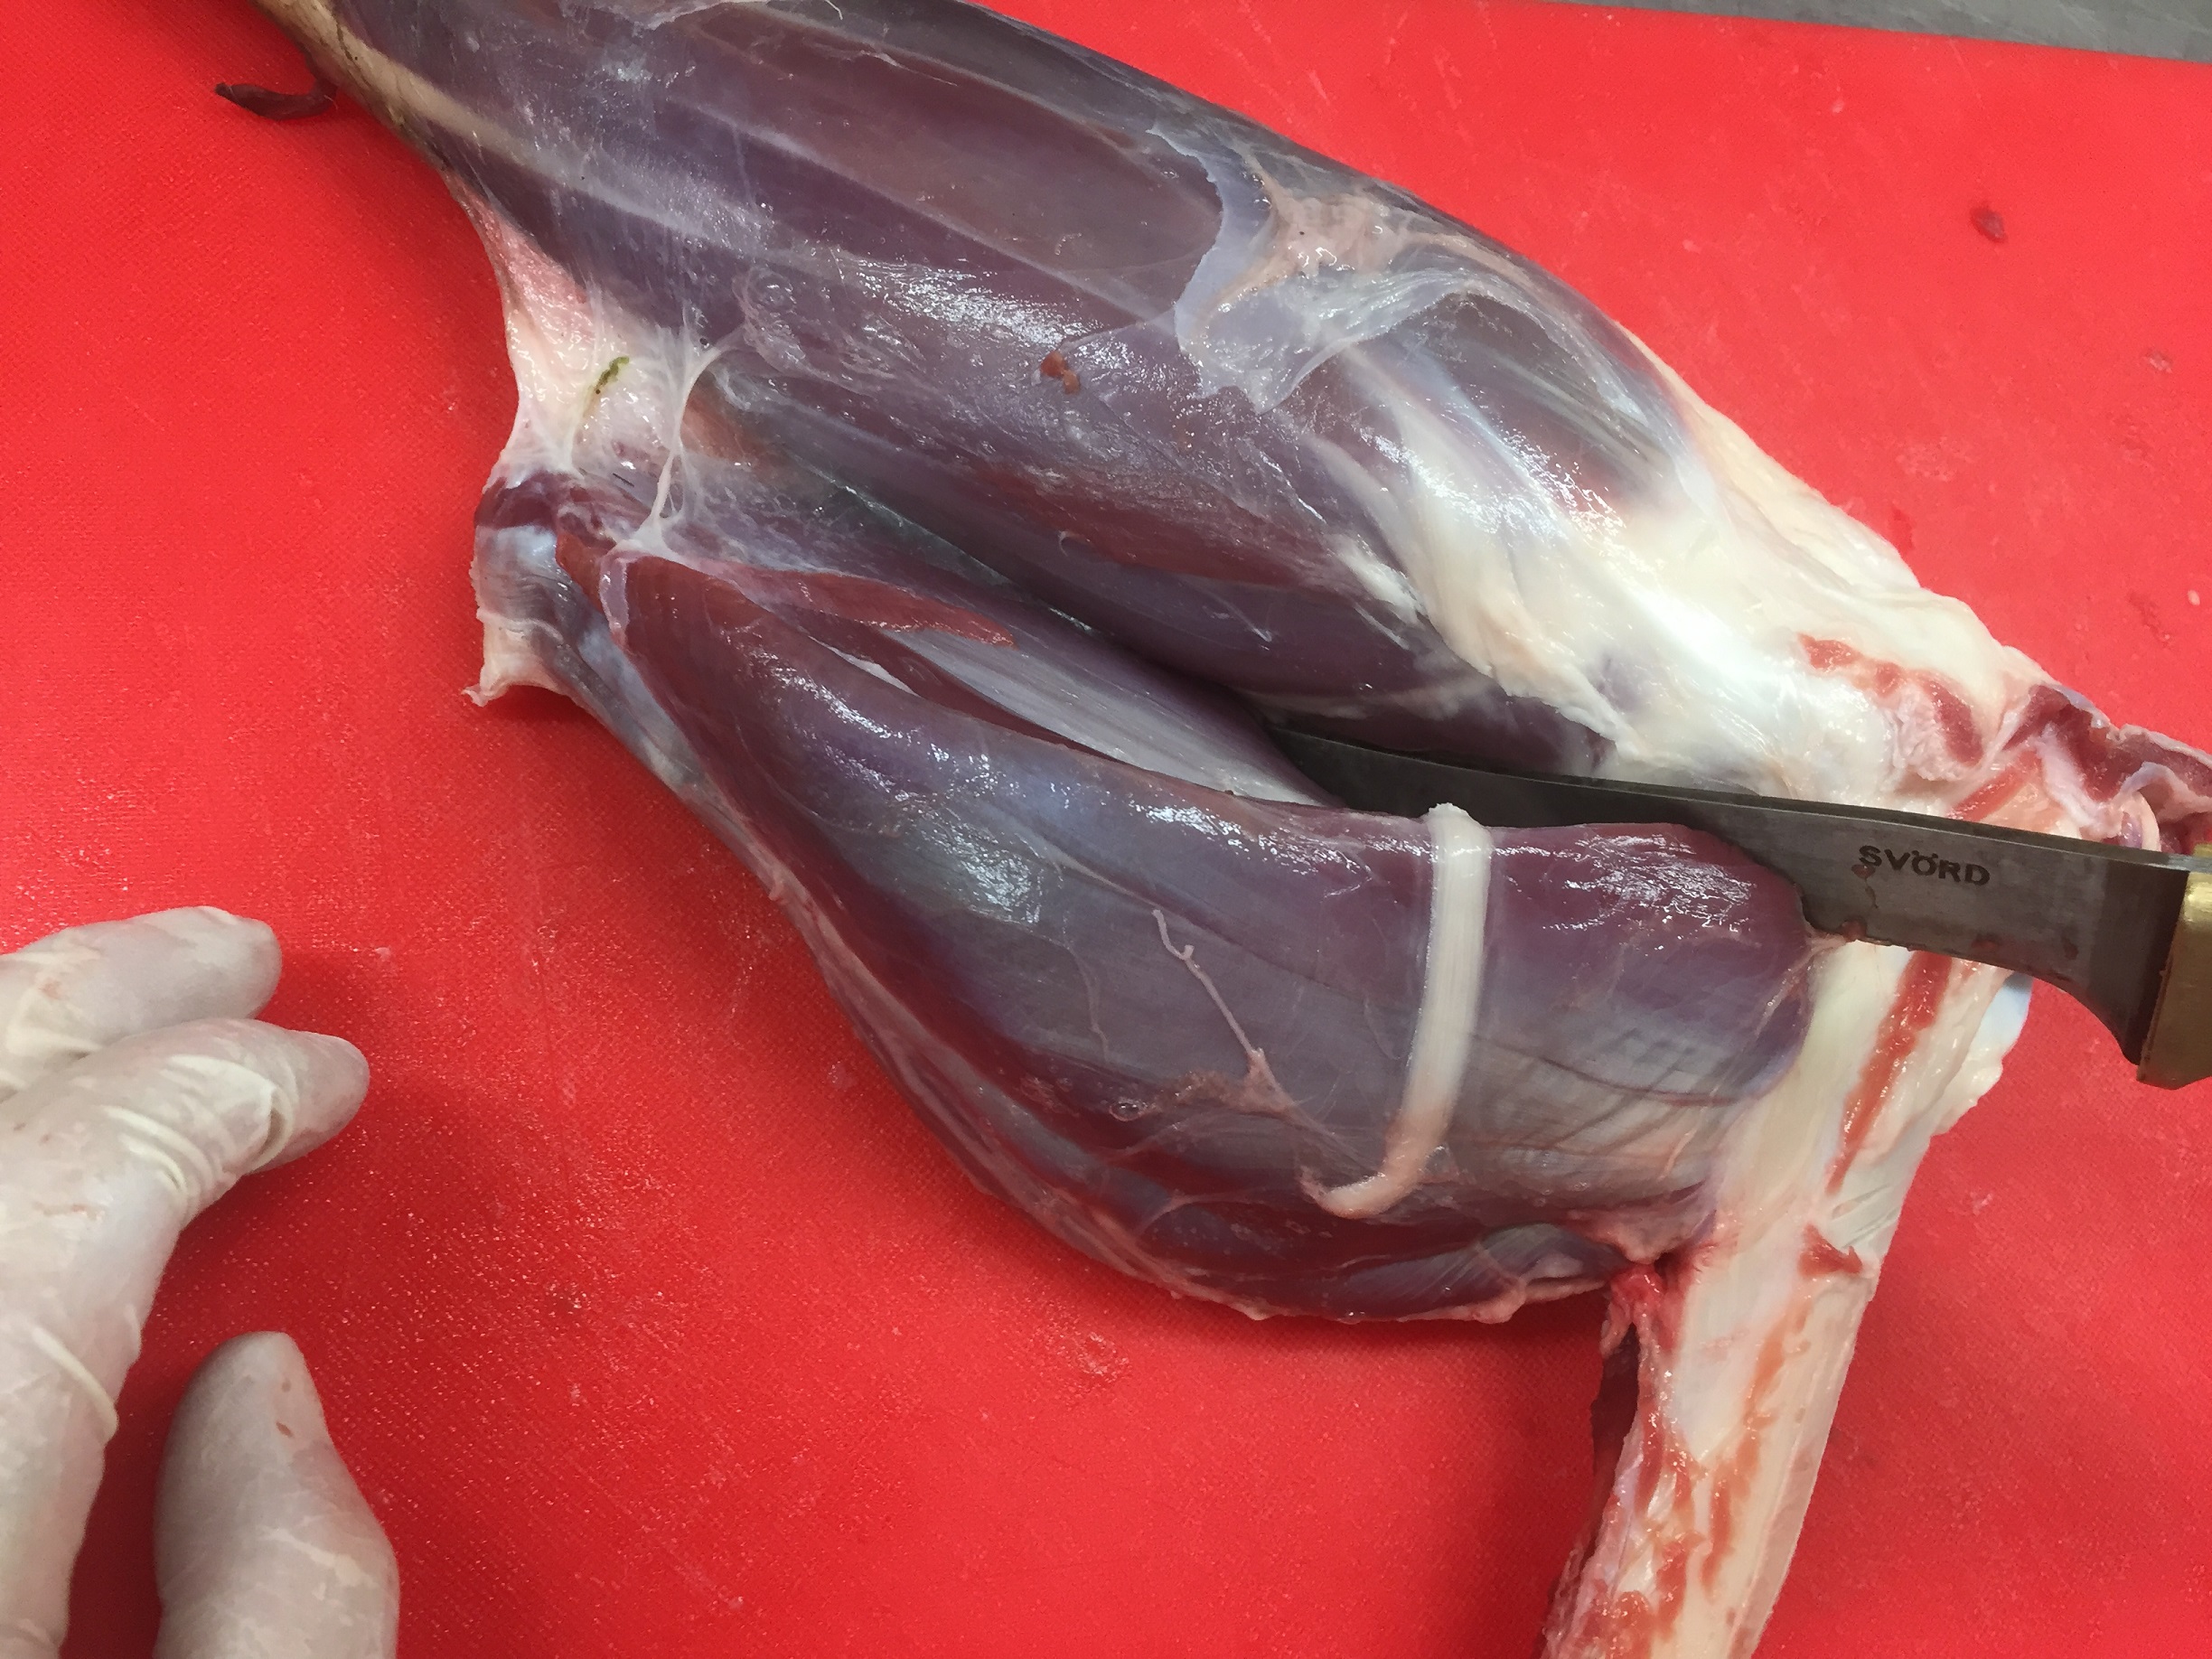
 Step 5

IMG_0739

Step 6:

Now you will have your leg broken down into the main muscle groups you can follow the natural sinew lines and break each primal into its individual muscle groups.
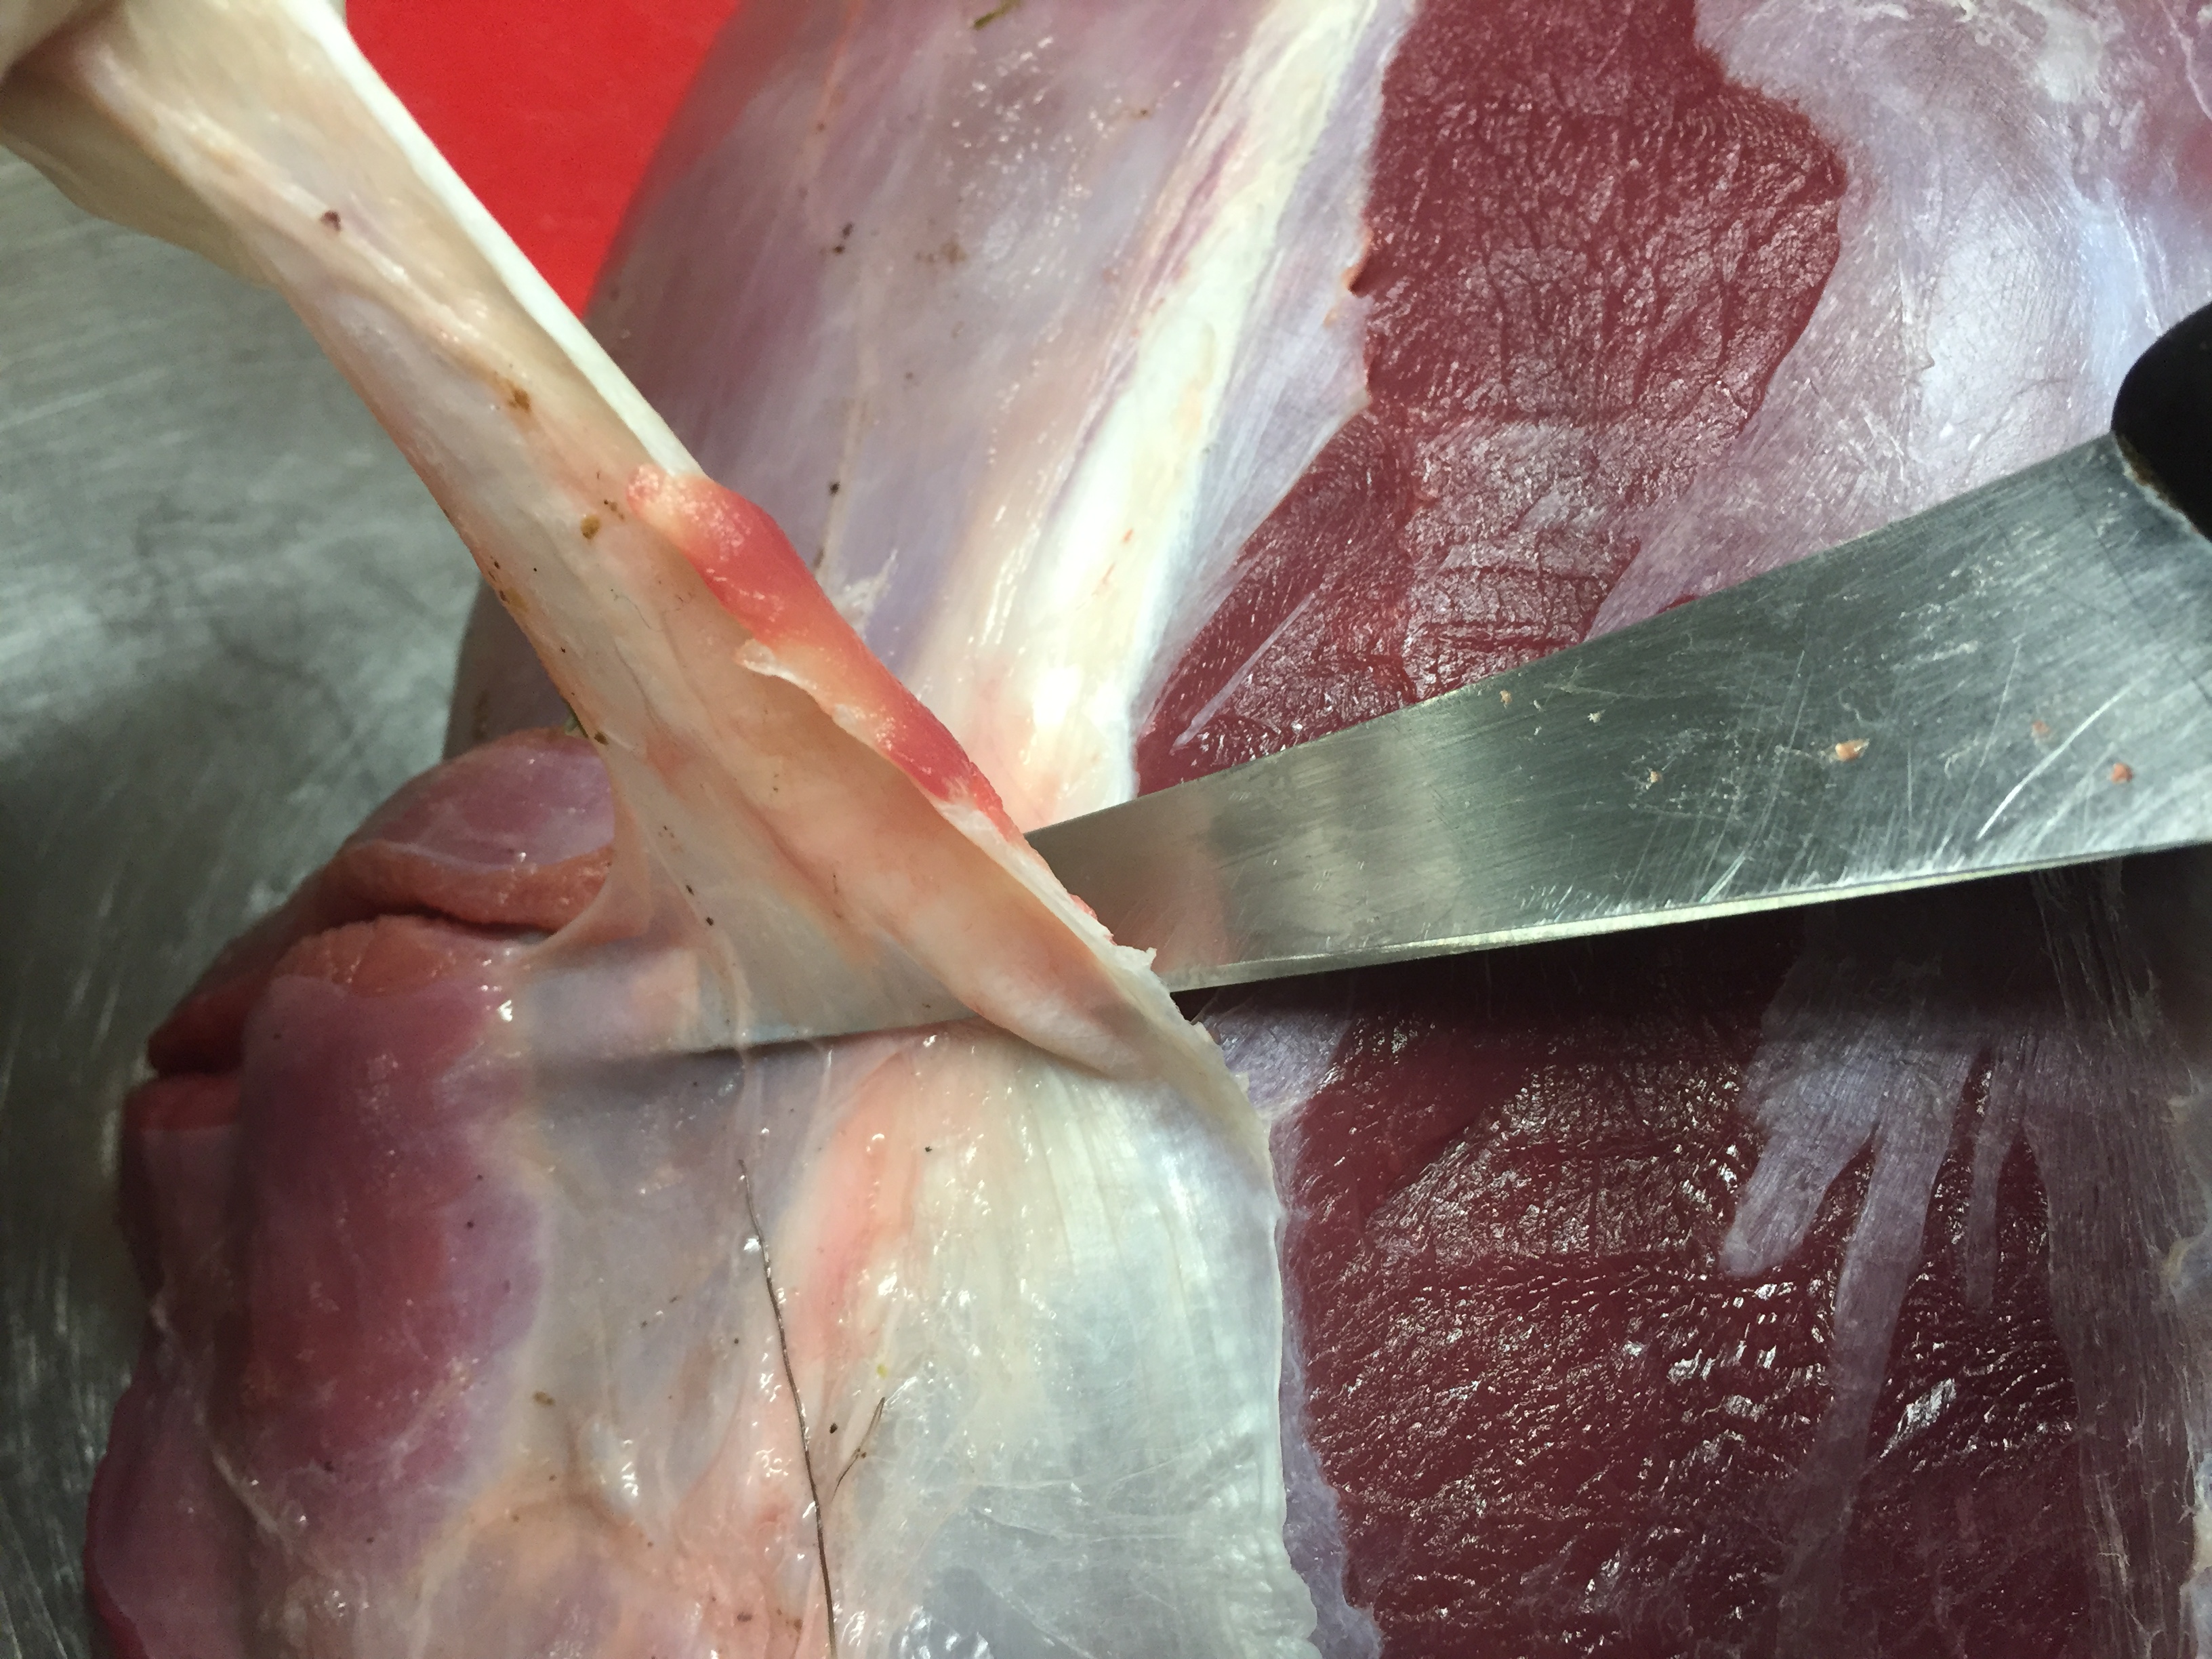
 Step 6

Step 7:

Remove all the membrane and silver skin by inserting your knife under the skin and with your knife angled upwards removing it by cutting it away in strips. If left on this will cook up very tough.

 Step 7

IMG_7863

Step 8:

Now that you have your meat trimmed up you can go ahead and portion it how you like. Either leave as whole pieces, cut into meal size chunks or portion into steaks or medallions ready for the BBQ. If you are going to freeze your meat be sure to make sure it’s wrapped well (this is where a vacuum packer earns its price) to avoid freezer burn.

Step 8

Leave a Comment

Filed under Recipes, The Hunter's Kitchen

Wild Venison Scotch Eggs

hunters kitchen spread

This recipe is a take on an old classic. It’s just like how your Nan would make but much, much better…

Scotch Egg


Wild Venison Scotch Eggs
Serves 4
Write a review
Print
Prep Time
30 min
Cook Time
20 min
Total Time
50 min
Prep Time
30 min
Cook Time
20 min
Total Time
50 min
Scotch egg
  1. 250g Venison mince
  2. 1cl Garlic- minced
  3. 1Tbs mustard
  4. 1tsp minced (or dried) Thyme
  5. 1/2tsp salt
  6. 4 Eggs
Aioli – makes 500ml
  1. 5 yolks
  2. 1 tablespoons Dijon mustard
  3. 1 garlic clove
  4. Juice of 1 lemon
  5. 400ml canola oil
  6. 100ml olive oil
  7. Salt and pepper
To Finish
  1. Breadcrumbs
  2. Flour
  3. Egg - whisked
For the Scotch eggs
  1. Combine all the ingredients except the eggs. Boil the eggs for 6 minutes then run under cold water until cold and peel. Get about a quarter of the venison mix in your hand, flatten out and bring round the egg to encase it.
For the Aioli
  1. Combine all the ingredients except the oil in a food processor or blender and blend well for 1-2 minutes. With the blender running on high, slowly drizzle in the oil to emulsify and create the aioli. If your aioli is too thick you can add warm water at the end to thin it down if necessary.
To Finish
  1. Take your venison wrapped eggs and dust them in flour, then egg and then finally in the breadcrumbs. You can deep fry these or if you don’t have a deep fryer you can bake them in the oven or shallow fry them but they will need to go into the oven for a few minutes until the centre is hot. Serve with a side of aioli
MacLean Fraser http://macleanfraser.com/


Leave a Comment

Filed under Recipes, The Hunter's Kitchen

Wild Venison burgers with pickled beetroot and a fried egg


Burger Pic

Wild Venison burgers with pickled beetroot and a fried egg
Serves 8
When it comes to using high quality ingredients I like to keep it simple. There’s no need to add a whole bunch of ingredients and flavours to something that is already so good and wild venison you’ve harvested yourself is about as good as it can get.
Write a review
Print
Prep Time
30 min
Cook Time
25 min
Total Time
55 min
Prep Time
30 min
Cook Time
25 min
Total Time
55 min
You’ll need to make or buy
  1. Burger buns
  2. Tomato relish or sauce
  3. Mayo
  4. Lettuce
  5. Tomato
Venison Burgers
  1. 800g venison
  2. 200g pork mince
  3. 1tps salt
  4. 1/2tspn white pepper
Pickled Beetroot
  1. 3 large beetroot
  2. 1/2C cider (or white wine) vinegar
  3. 1/2C sugar
  4. 1/2C Water
For the Burger patties
  1. Combine all ingredients well, mould into burger shapes 1-2cm thick and keep in the fridge until you’re ready to cook them.
For the Beetroot
  1. Place the whole beetroot in a pot of salted water and simmer until the beetroot is very tender. Drain then rub the skins off and slice. Combine the vinegar, sugar and water and bring to the boil then take off the heat. Add the beetroot to the vinegar mix and allow to cool before storing in the fridge. Will last at least 4 weeks.Is best made well ahead of time and left to marinate.
To serve
  1. After you’ve made your pickle and got your burgers ready, the first thing you’ll want to do is get your lettuce washed and either shredded or pulled apart and your tomatoes sliced up. This is a great recipe to throw on the BBQ if you get some good weather, so get your hot plate warmed up, crack a cold beer and get ready to make some burgers. Grease your hotplate (or fry pan if using the stove) with a little oil and making sure it’s nice and hot throw your venison on. Give it about 2-3 minutes on each side to ensure it is nicely browned but make sure you cook it so it’s still pink in the middle. Warm your buns, fry your eggs then put the whole thing together. Spread some tomato relish on the bottom bun and mayo on the top, place your lettuce and tomato on the bottom bun, then your venison, beetroot relish and then finally your fried egg and put the lid on.
MacLean Fraser http://macleanfraser.com/

Leave a Comment

Filed under Blog, Recipes

Venison Koftas with Mint Yoghurt

hunters kitchen spread

When trimming up and portioning my venison I always end up with offcuts and trimmings that you can struggle finding a use for. If you’ve made the kill and gone to the effort of carrying as much of the meat out as you can it seems a shame to waste any of it, and this is where a mincer comes in handy. If only doing limited quantities you can purchase a small hand mincer for a minimal investment and it will pay for itself in no time. Hang on to all your venison trimmings to put through the mincer and you can use them to make this easy BBQ recipe. Make sure to soak bamboo skewers in water so they don’t burn when putting them on the grill. Ground spices can be used in place of the whole spices if you don’t want to grind them yourself, however you will always get better flavour grinding your spices fresh.

Venison Kofta MacLean

Venison Koftas with Mint Yoghurt
Serves 6
Write a review
Print
Prep Time
20 min
Cook Time
20 min
Total Time
40 min
Prep Time
20 min
Cook Time
20 min
Total Time
40 min
Venison Koftas
  1. 400g Venison mince
  2. 100g Pork mince
  3. 1 Egg, lightly beaten
  4. 1/2C Breadcrumbs
  5. 3cl Garlic, minced
  6. 2tsp Cumin seeds
  7. 2tsp Coriander seeds
  8. 1tsp Fennel seeds
  9. 1/2tsp Chilli flakes
  10. 2tsp Smoked Paprika
  11. 1tsp Salt
Mint Yoghurt
  1. 1/2C Plain Yoghurt
  2. 10-12 Mint leaves
  3. Squeeze lemon juice
  4. Pinch salt
For the Mint Yoghurt
  1. Finely slice the mint leaves and mix together with the yoghurt with a squeeze of lemon and a pinch of salt to taste. Keep in the fridge until ready to serve.
For the Koftas
  1. Lightly toast off the whole spices and grind together in a spice grinder or pestle and mortar. Place all the ingredients in a bowl and mix together until well combined. Wrap some of the venison mix around your choice of bamboo skewers and place them on the grill plate of the BBQ for about 3 minutes a side until just cooked through. Alternatively you can fry them in a pan over a moderate heat with a little oil to stop them from sticking.
  2. Serve the koftas with some warmed flat bread, a fresh seasonal salad along with the mint yoghurt.
MacLean Fraser http://macleanfraser.com/

Leave a Comment

Filed under Recipes, The Hunter's Kitchen, Uncategorized

Home-Made Egyptian Pastrami

IMG_2470 - Copy (2)Curing your own meat can be very rewarding. It might sound difficult or time-consuming but it isn’t really. There is about an hour of actual work involved maximum and the rest is just sitting back, relaxing and waiting. This recipe uses beef but there’s no reason why you couldn’t use any other red meat such as venison. Curing meat in ways such as this was used as a type of preservation before refrigerators but we still do now because it’s so damn tasty. Once ready make sure you slice as thinly as you can and can enjoy in lots of different ways such as in a sandwich or part of a meat or antipasto platter.

Egyptian Pastrami
Yields 1
Write a review
Print
Prep Time
1 hr
Prep Time
1 hr
Ingredients
  1. 2kg Beef Striploin (or other lean meat)
  2. 75g Sea Salt
  3. 75g Sugar
  4. 100g Garlic (peeled)
  5. 50g Fenugreek powder
  6. 50g Paprika (smoked variety preferably)
For the beef
  1. Remove all fat and silver skin/sinew from the beef and in two legnth-wise to about the same size as a big salami. Mix together the sugar and the salt and pour over the beef. Place in the fridge covered with cling film for three days, turning the beef each day to ensure that it is evenly cured. After three days wash off the salt and sugar mix from the beef with cold water and pat dry with a paper towel. Place the beef in an appropriate dish and place another dish on top. Place on top as much weight you can in the form of maybe full cans, jars, bottles etc, it doesn't matter what it is so long as there is a decent amount of weight pressing down on the beef. Return to the fridge and leave for three days. Check every now and again and if any liquid has come out of the beef then discard the liquid and return the beef back to the fridge.
For the marinade
  1. Take the garlic, fenugreek and paprika and blend in a food processor to a paste. Coat the beef in the paste making sure the beef is 100% covered with a layer about 3mm thick. Hang the beef with some string in a cool, dry place out of the sun for about 10 days. Once ready you can slice the beef and enjoy however you like. The outer coating is edible or you can discard if you like. Keep wrapped with cling film in the fridge or freeze.
MacLean Fraser http://macleanfraser.com/

1 Comment

Filed under Blog, Recipes